- Utilisez le Manuel de Style pour le montage correct.
- N'oubliez pas de retirer ce modèle une fois l'article correctement traduit.
| FIRS Industry Replacement Set | |
| Artist | andythenorth and others |
|---|---|
| Coder | andythenorth and others |
| Category | |
| Homepage | |
| Copyright | GPL v2 |
FIRS Industry Replacement Set
FIRS est un NewGRF contenant des nouvelles industries et des nouvelles marchandises pour OpenTTD. Il introduit deux nouveaux concepts : les industries de matières premières nécessitent des approvisionnements réguliers de pièces de rechange pour se développer, et les industries de transformation vont augmenter leur production tant qu'ils obtiennent des approvisionnement de deux types de marchandise le même mois. Si vous ne prenez pas compte de ces changements, vous avez un sérieux handicap comparé à une partie standard, mais en prenant en compte ces deux différences importantes, vous pouvez créer un réseau plus fiable sous FIRS qu'avec les règles standard.
FIRS permet également la fabrication certaines industries tertiaires à un prix décent : le magasin, la pompe à essence, le jardin du constructeur. Généralement, ce sont des industries urbaines acceptant les biens, la nourriture, l'alcool, le pétrol et les matériaux de construction. En fournissant un moyen relativement bon marché d'obtenir l'accès à ces débouchers, une partie de FIRS devient moins dépendant de la croissance aléatoire des villes. Dans FIRS, les boutiques et les pompes à pétrole fournissent un point de distribution stable de ces marchandises qui ne risquent pas de disparaître sans qu'on s'y attende..
Pour télécharger FIRS, merci de passer par le contenu en ligne disponible dans l'interface du jeu où d'y accéder via cette adresse : http://bundles.openttdcoop.org/firs/
Contents |
Strategy Tips
Industry Growth
FIRS includes control parameters that allow you to determine whether or not primary and secondary industries shut down, or shrink if not supplied with spares. If you do turn on these parameters, you will find that primary industries will slowly shrink to nothing and shut down if you don't take steps to supply them in time. You do have several years' grace, but you can't neglect supplying your industries with engineering or farm supplies forever.
Over the years, typical production (for e.g. a scrap yard) might be something like 72–72–64–72–64–56–64–64–56 and so on; by the time average production has dropped by a full 'step', it's a good idea to have a machine shop linked in to your network, if you are running an 'engineering network' or a lumber yard if you are running a 'farming network'.
Unserved industries will tick over for somewhat longer; this warning mostly applies to the places where you have built stations. Furthermore, industries won't grow until they have received regular arrivals of spare parts for at least a few months.
On easier difficulty settings, these concerns do still apply, but they are less pressing, because new industries appear at a greater rate, replacing the losses and increasing the odds that a new industry will pop up in a convenient spot to be cheaply linked in to your transport network.
Supplies
Engineering Supplies
"Do the steel chain first, send ENSP everywhere, get $$$." — Terkhen
Call this approach an 'engineering network', as it relies on supplying mines and quarries with engineering supplies, and initially ignores the smaller but more numerous farms.
Two good starting chains are:
- Oil Wells/Oil Rigs (Oil) → Oil Refinery (Petrol 8/8) → Machine Shop (ENSP 8/8) → Oil Wells/Oil Rigs.
- Coal Mine/Iron Ore Mine (Coal/Iron Ore) → Steel Mill (Metal 2/8) → Machine Shop (ENSP 8/8) → Coal Mine/Iron Ore Mine.
Farming Supplies
Farming supplies are easier to generate and will have many more customers on the map, so another course to consider is to produce farming supplies from a lime kiln or fertilizer plant and use a farm feeder system to spread these supplies about. Call this approach a 'farming network'. The greater numbers of farms on the map increases the odds that one of them will quickly increase production once it has received its spare parts. However, this setup requires greater initial spending on roads or rail lines, and may be too costly on harder difficulty settings. If you follow this route, it's important to connect a forest to a lumber yard reasonably quickly, otherwise the coal mines and quarries supplying your lime kiln – and hence chemicals to your fertilizer plant – will slowly degrade due to lack of spare parts. A similar concern applies if you use an oil wells/oil refinery route instead, because oil wells need engineering supplies too. Biorefineries, if available, are better to use; you can then run separate networks for farming industries (all supported with farming supplies) and mining industries (all supported with engineering supplies).
Manufacturing Supplies
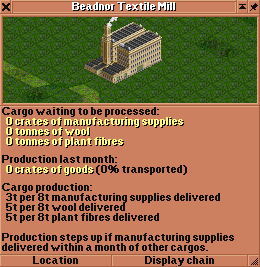
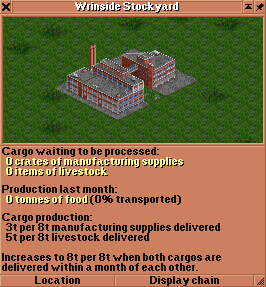
Manufacturing supplies help to boost production too, but they work in a different way. The Production Rates section below explains the behaviour of secondary industries receiving mixed cargos. For an industry that uses manufacturing supplies, manufacturing supplies must be one of the mixed cargos in order to qualify for the production boost. For example, the textile mill accepts wool, plant fibres and manufacturing supplies. Any combination of wool and plant fibres produces output at a rate of 5t per 8t delivered. Only if manufacturing supplies are delivered as well can the ideal 8t per 8t ratio be achieved.
To summarize:
- Manufacturing supplies only: 3t per 8t delivered
- Wool only: 5t per 8t delivered
- Plant fibres only: 5t per 8t delivered
- Wool + plant fibres: still 5t per 8t delivered
- Wool + manufacturing supplies: 5t + 3t = 8t per 8t delivered
- Plant fibres + manufacturing supplies: 5t + 3t = 8t per 8t delivered
- All three: still 5t + 3t = 8t per 8t delivered
Hence this is another case where 'supply orders' may be useful. See below.
Supply Orders
The FIRS manual suggests using transfer orders to deliver engineering or farm supplies a few at a time in smaller vehicles. In fact, using such supply orders effectively is probably the major game play difference between FIRS and standard OpenTTD. There are several ways of delivering these supplies to the industries, some are explained below. First a tactic that requires two stations at one industry with a truck moving between these stations at set times. The second tactic relies on a stockpile station in-between several industries with trucks moving goods from this station to the industries.
Single Tile Tactic
One convenient way to manage your supply orders using trains and trucks is shown below. However, it's not the only way; if you have several industries close together, you may prefer to use an engineering supply feeder station instead.
Tip: Use Ctrl-click when adding the truck stations, otherwise they may join to the other stations when you don't want them to, or fail to join when you do. If you use the 1×3 layout, consider angling the outer drive-through station so that it has a free end; then you will be able to connect other roads later, if needed.
Usage is as follows:
- Set up a supply train with a capacity of around 60–120 crates of engineering or farm supplies, as appropriate.
- Deliver these crates using 'Transfer and Leave Empty' orders.
- Set up a small low-capacity local supply truck.
- Refit the truck to deliver 1–4 crates of engineering/farm supplies at a time.
- Timetable the truck so that its total journey takes about 28 days.
- To keep the ratings for engineering/farm supplies high, the truck should spend most of its time waiting at the supply arrival station.
By doing this, you ensure that your initial consignment of 60–120 crates of supplies will be delivered at a rate of 1–4 crates a month, which means the station won't need to be resupplied for anything between one and ten years. The delivery truck won't be very profitable, but the increased production from the main industry will completely dwarf any minor losses you make.
Tip: Since you aren't worried about profitability for these routes, you can use slower engines/wagons that will flow smoothly in traffic with your slow and heavy freight trains. You don't want fast supply trains cutting off coal or iron ore trains at a junction and making them stop.
Tip: If you find production grows at a faster rate than your network can handle, or if you accidentally generate an over-large supply stockpile, you can fine-tune the delivery rate by changing the truck's waiting time; longer (more than a month between deliveries) to slow industry growth, shorter to burn through supplies faster.
Once all your stations have a good store of supplies, switch the supply trains from 'Transfer and Leave Empty' orders to 'No Loading', and then you can profit from excess production without having to rejig a large number of vehicle orders.
Note that supply orders are useful in other areas of the game, too. See Production Rates, below.
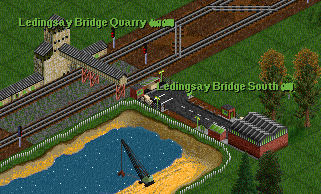
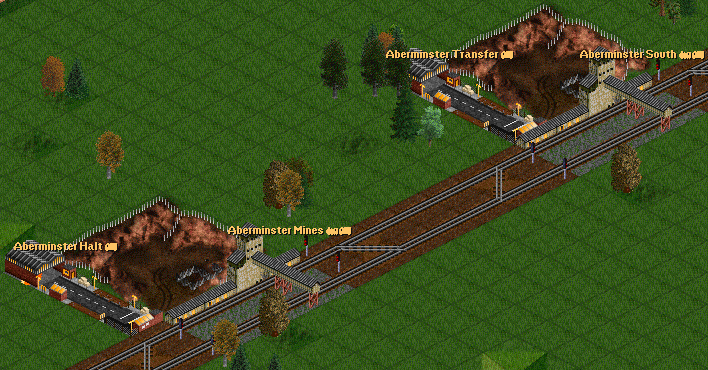
Tip: Avoid lining up stations exactly with the industries they serve; leave a corner free so that you have some space along which to line up the truck stations:
While placing Aberminster Mines truck station 'round the corner' from the main railway station doesn't matter very much, if you later wanted to extend the station length northwards, you'd be limited to 11 squares length. By contrast a station set up like Aberminster South can be extended to 12 squares in either direction without having to demolish and rebuild the truck station.
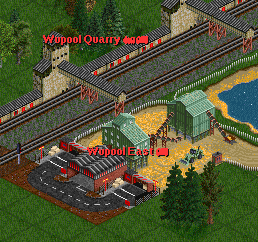
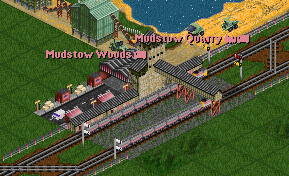
Stockpile Station
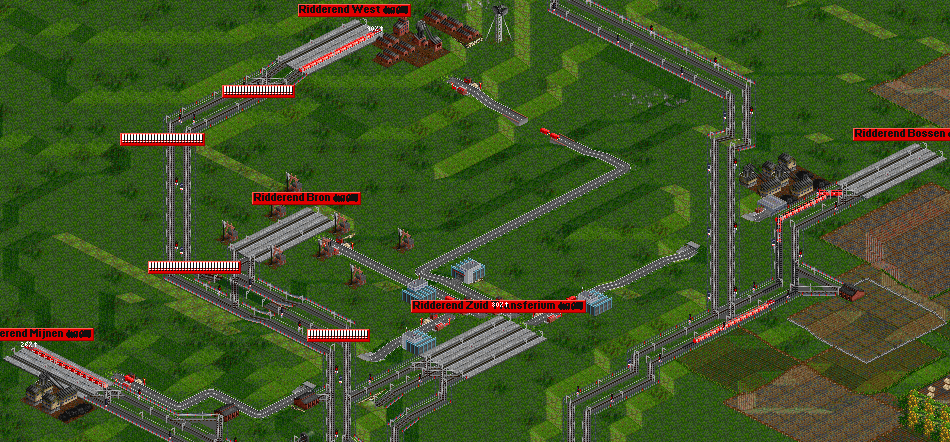
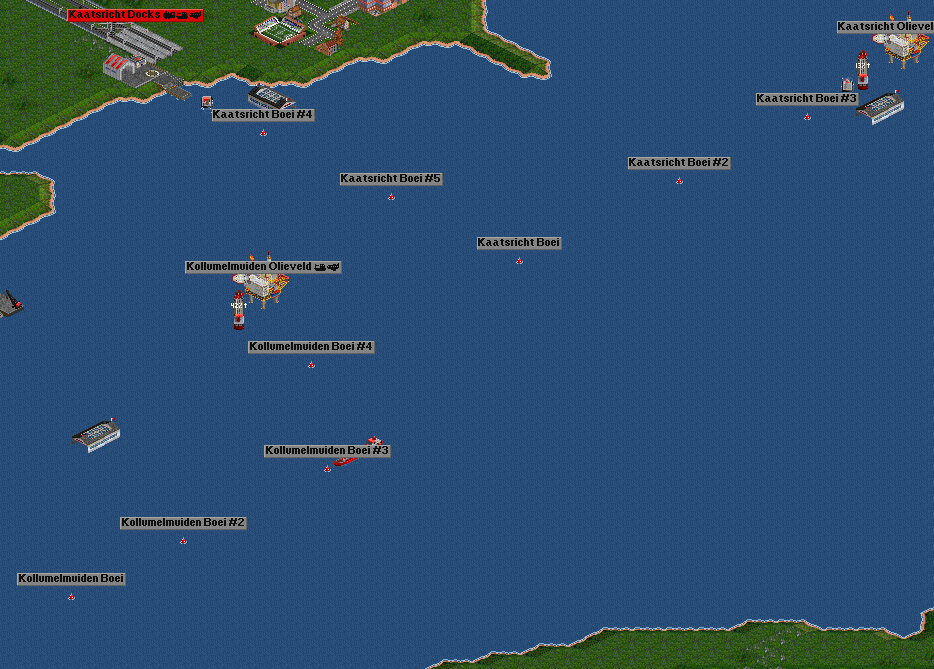
A second approach to the delivery of supplies to primary industries is the use of hub stations. When industries are relatively close to each other, one can position a station in-between those industries. This station functions as a transferium, stockpile or hub station where trucks come and go, these trucks then deliver the supplies to the industries. Below are two examples, the first example shows a few mines closely coupled together. In-between these mines a train station was placed with a few truck stations adjacent to it. Trains drop off engineering supplies at this stations using transfer leave empty. Trucks pick up these goods and drop them of at the industries. The truck's orders are to ones own liking, but it is important to remember that FIRS to work optimal a monthly delivery of goods is required, the primary industries do not care about quantity. The second example shows a similar situation, however, this example concerns oil rigs. A harbour is joined with the train station. Instead of trucks, two small hoover crafts of the FISH NewGRF are used.
Feeder Systems
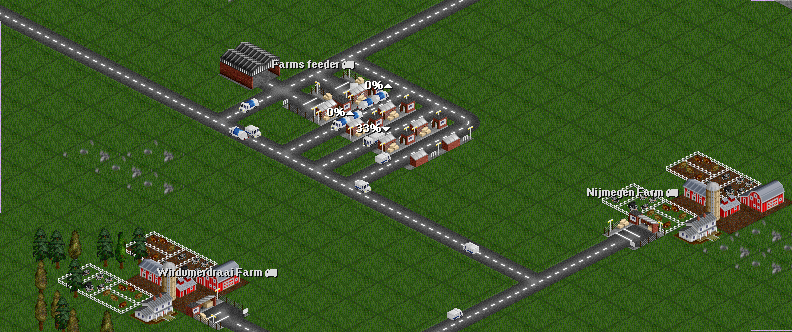
Farms are good candidates for setting up a feeder system. They provide raw materials like milk, and need farm supplies.
In this image, big trucks bring farm supplies to the feeder station and collect the milk from it. Small cargo trucks distribute the supplies to all the farms, and small milk trucks drive around along all the farms collecting milk, until fully loaded. Then they bring the milk to the big milk truck at the feeder station.
Whenever you have groups of several industries close together, this setup can be used to distribute supplies (engineering, farming, or manufacturing) from a central point. It's a good technique to use whenever you need to share out supplies from some distant common resource to several industries.
On some map setups, you might use aircraft or ships in these roles; in all cases, you would use large vehicles to perform the bulk transport role, and smaller ones to perform the 'last-mile' distribution or collection for you.
Cargo Chart
Flow of cargos between FIRS industries.
chart for FIRS 0.5.3 by Fry3k (http://www.tt-forums.net/viewtopic.php?p=913596#p913596)
Cargo flow for FIRS 0.7.x
Cargo Priorities
Which cargos to deliver first depends on the terrain layout and your personal preferences, but here are some factors to consider:
Oil wells have the largest initial production of any industry. That means even if their production does drop over time, they'll last the longest before shutting down. If you see an oil refinery with a machine shop nearby, an oil-petrol-ENSP line is just as good an initial chain to set up as the steel or aluminium chain.
Coal and iron ore mines are the next most prolific, while junk yards are the least. Most farming-type industries are equal, generally producing about 18 tonnes of two cargos. The exceptions are forests, which start out at iron ore mine levels of production, and fishing grounds, which are about half that production level, but tend to be very numerous.
Fishing grounds are individually modest producers, but there are lots of them and they can't receive any maintenance even if you wanted to send them some. The limiting factor on exploiting fishing grounds tends to be the comparative rarity of fishing harbours, and their sometimes strange placement – e.g. in isolated lakes without fishing grounds. If you do encounter a well-placed harbour, it may be worth at least running it at maintenance level until you can build a fishing fleet. The best way to use ships with FIRS is generally to use straight-line ship-to-shore routes and then transfer the cargo onto faster trains for transport to the often distant fishing harbours.
Do keep an eye out for oil wells, dredging sites and fishing grounds close enough to shore to be within the catchment area of an on-shore station. Delivering engineering supplies becomes much easier in such cases as well. You can let the industry transport its production to shore in its own (invisible) vessels; you may not even need to provide a dock.
Production Rates
The production rates of FIRS' secondary industries are affected by the number of different supply types arriving in a given time period. For example, a lime kiln supplied with 100 tonnes of stone will generate 50 tonnes of output; 25 tonnes of farming supplies and 25 tonnes of chemicals. Allowing for a 50–75% station rating, that will generate 12–20 tonnes each of chemicals and farming supplies for you to deliver. This means you may want to size your outgoing delivery trains as small as 10–40% of the inbound supply trains. There is a compromise level to be chosen so that you transport reasonable amounts of secondary supplies reasonably quickly, without waiting too many months for an over-large delivery train to fill up.
If both primary resources are supplied in the same production cycle, production increases. 50 tonnes of coal plus 50 tonnes of stone to the same lime kiln would produce 50 tonnes each of farming supplies and chemicals; twice as much. Allowing for the station rating, you will then have perhaps 25–40 tonnes of each cargo type to deliver, and you can then double the size of your delivery trains. In fact, any mix of coal and stone will produce a similar production increase, even 99 tonnes of one and only one tonne of the other.
While there is some variation, to count as part of the same 'production cycle' generally requires cargos to arrive within 30 days of one another.
Note that this is another case where supply orders become useful; deliver 100 tonnes of coal and stone using a transfer order, then supply them to the lime kiln a tonne each a month, in just the same way as you might handle engineering supplies to a mine. Whenever your larger deliveries of coal or stone arrive, even if they don't appear within 30 days (approx.) of one another, they will still qualify for the increased production rate. Once the kiln gets very busy, and you can be certain both cargos will always arrive in the same 30 day period, you can cancel the supply order as no longer needed.
Some industries – including steel mills and aluminium plants – accept three different delivery types. This gives several combinations of possible production rates. For example, a steel mill produces 2t per 8t of iron ore delivered, 2t per 8t of coal and 4t per 8t of scrap metal. If you deliver coal and scrap metal, you'll get 2t + 4t = 6t of output per 8t delivered. Coal plus iron ore gives 2t + 2t = 4t per 8t delivered. If you deliver all three, you'll get 2t + 2t + 4t = 8t per 8t delivered. The older and less efficient iron works generates 2t per 8t of iron ore, and 1t per 8t of wood; so even if you deliver both within 30 days, you'll still only get an output rate of 3t per 8t.
Some secondary industries benefit more from the arrival of some materials than others. Again, steel mills and aluminium plants are affected by this; in both cases, one tonne of scrap metal is as good as two tonnes of the industries' other supplies (iron ore, coal, bauxite or chemicals). This is mostly counterbalanced by the fact that scrapyards are initially half as productive as mines. However, that in turn means that growing a scrapyard by bringing it engineering supplies brings twice the benefit. Lumber yards, by comparison, have a 6:2 production ratio between lumber and chemicals; thus if you can only manage one cargo type, delivering processed timber to a lumber mill is three times as effective as delivering chemicals. This is the main reason why setting up a forest–sawmill–lumber yard chain should be a high priority when you are running a 'farming network'.
Founding New Industries
Even when the game settings permit it, founding new industries is usually ruinously expensive, but there are three exceptions: stores, petrol stations and builders' yards are much, much cheaper than the average. Bear in mind that whenever you want to sell on goods, petrol, food, alcohol or building materials, if you can found your own industries you can create a ready-made recipient for these materials at a place of your choosing.


