- Verwende bitte das Styleguide für die korrekte Formatierung.
- Ist ein Artikel zu 100% übersetzt, kannst Du diesen Hinweis entfernen, wenn Dir nach einer Kontrolle der Übersetzung kein Fehler mehr auffällt. Bist Du der Erstübersetzer, lasse diesen Hinweis bitte stehen, so dass der Artikel mindestens von einer weiteren Person überprüft wird.
Allgemeine Informationen zu Signalen und wie sie konstriert werden enthält der Haupt-Artikel: Signale
Tidy this up into a proper showcase of complicated signaling arrangements. Maybe even export it all to new types of Junctionary (en) or into Stations (en).
Contents |
Pre-signals and a single track intersection
This example should give you a good idea of the help that pre-signals can be, and an example of combo signals.
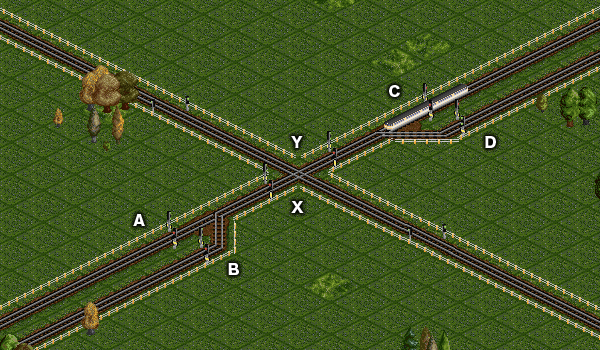
For example, a line has two trains, each going to its own station.Both trains travel along a single north-south track for part of the way. You'd use regular two-way signals where the lines switch onto the single section (four in total, one for each switch).
What if you want a new east-west track to cross the north-south track? Let's say you don't want to use a bridge, and your new east-west track is a high-speed service. It can't wait for northbound and southbound trains to clear the whole single section. You run the tracks across each other, and make a 4-way intersection surrounded by regular two-way signals. The problem: the signals break up the north-south section of track, meaning a northbound train could meet a southbound train at a red light at the intersection.
The solution: Pre-signals. Set up entrance pre-signals (horizontal yellow) where the trains on the north-south line switch onto the single track. At the intersection, set up combo pre-signals (vertical yellow) on the north-south line. (You can keep using normal two-way signals for the east-west line.)
How it works: Call the southern entrance signals AB, the combo signals at the intersection X (south side) and Y (north side), and the northern entrance signals CD. A northbound train enters the single track at AB. AB works just as normal signals. X turns red for southbound trains. X is an exit signal for Y, so Y also turns red for southbound trains. Y is an exit signal for CD, so they both turn red for southbound trains too. In the meantime, an east-west train can pass through. Here it is the other way around: A southbound train enters the single track at CD. Y turns red for northbound trains, and Y is an exit signal for X, so X turns red, which is an exit signal for AB which also turns red.
Optimal pre-signaled station
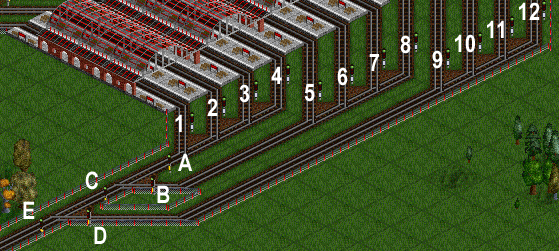
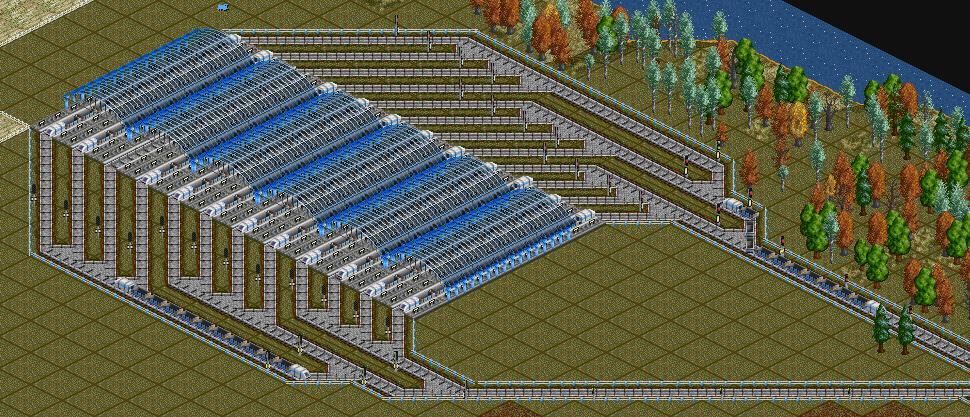
Below is an image of an "optimal" Pre-signal station layout. With these signals trains will choose any free platform and if none is free it will wait at the entrance instead of brutally picking one and waiting for that train to leave. One big advantage of this layout is that the trains will very rarely have to stop before entering the station.
Explanation of the signal types:- Signals 1 through 12 are Pre-signal Exits
- Signals A, B, C and D are Combo Signals
- The signal E is the only Pre-signal (Entrance)
- If signals 1, 2, 3 and 4 are red then signal A will be red.
- If signals 5, 6, 7 and 8 are red then signal B will be red.
- If signals 9, 10, 11 and 12 are red then signal D will be red.
- If any train is between signal A and signals 1, 2, 3 and 4 signal A will be red.
- If any train is between signal B and signals 5, 6, 7 and 8 then signal B will be red.
- If any train is between signal C and signals A and B then signal C will be red.
- If any train is between signal D and signals 9, 10, 11 and 12 then signal D will be red.
- If any train is between signal E and signals D and C then signal E will be red.
- If signals A and B are red then signal C will be red.
- If signals C and D are red then signal E will be red preventing access to the station.
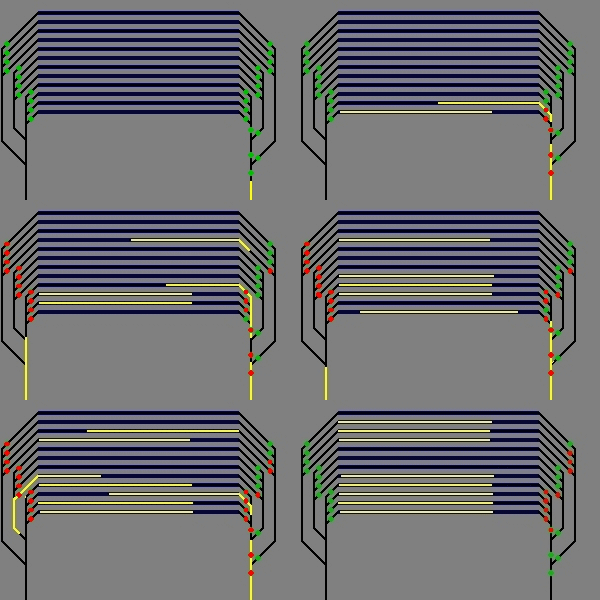
Below is an animation of how this would work in the game.
As the animation shows trains can choose any track without too many problems.
Another example
Double entry "RoRo" stations
The layouts we have seen above are great for their purpose - allowing lots of trains coming from one place to enter a free platform efficiently.
However, such station layouts can mean a lot of queuing further up the track as many lines merge to form one. This can be a particularly frustrating problem if you are dealing with large freight trains which will take a long time to get up to speed after stopping at a signal to let another train through.
Now that you are familiar with the basic RoRo station above, you can look at ways to reduce this:
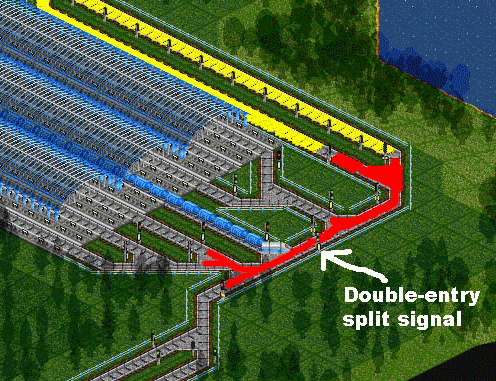
The Double-Entry Split Signal is simply a combo signal that manages the whole system.
The interesting part about this layout is that more than one train can enter the red line at the same time!
If all platforms were free then a train approaching from the bottom left would get a green on its entry signal, being directed to one of the nearest platforms, while simultaneously, a train entering the red line from the yellow side would be able to enter and go to one of the rightmost platforms - without interfering with each other thanks to the split-signal.
This is far more efficient than forcing all 4 lines entering the station to merge into one line to be controlled by the standard RoRo layouts above.
The train currently entering in the image above must have come from the yellow line and passed the entry signal while all available platforms on the right of the double-entry split signal were occupied.
However, the double-entry split signal saw that the 4th platform from the left was free as its exit signal was displaying green as the train entered the system, and therefore the train was directed to this free platform.
Had a second train arrived on the red line, it would be able to utilise the now free platform 3rd from the right (which had cleared since the train above had entered the system).
Free tracks
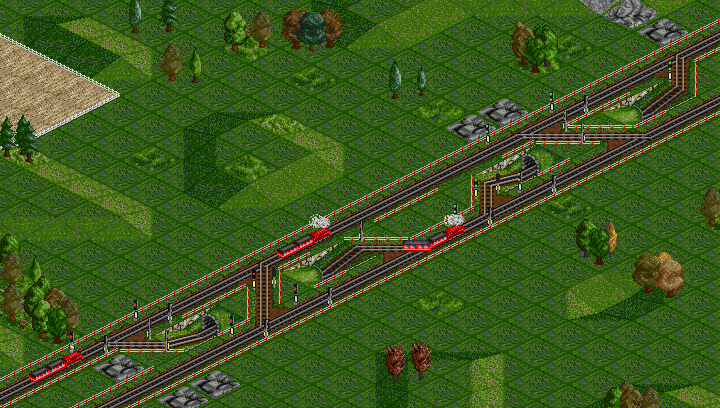
Suppose you have two tracks leading from two sources to the same location. You want each source's own traffic to have priority on its own track but want to utilize spare capacity on one of the tracks because the other is getting busy. This can be achieved with Signals (en).
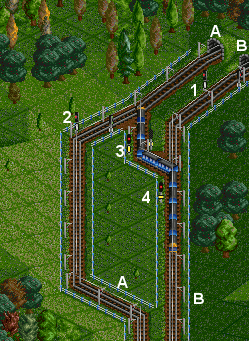
In the diagram, the two tracks are labelled A and B leading into tunnels A and B respectively. Track A is the one with a less frequent service whose spare capacity we want to use. Track B is very busy and needs some breathing space, which we can get by diverting traffic onto A. However, what we don't want to do is let B's traffic disrupt the service on A - in other words A needs priority on its own tunnel. We arrange this by using presignals.
Assume each of the tunnels is signaled at the opposite end so that when a train leaves the tunnel the signals at this end clear. So signal 1 will show green when tunnel B is clear, which will in turn make entry presignal 4 green. The interesting part comes when tunnel B is blocked, so 1 is red. In that case we want an incoming train to use tunnel A, but only if there isn't a train on track A wanting to use it.
We connect the tracks as shown and place signal 3 as an exit signal to 4 so that a train coming up to 4 can use either 3 or 1, whichever is available. Now, we need to stop 3 showing green if a train on A needs to use the tunnel. To do this we simply make signal 2 a bi-directional exit signal. Then if there is a train in the block before it on A (i.e. one with priority on the tunnel), the back of the signal will show red, otherwise it will of course be green. Then, if we make 3 a combo signal, it will show red in two cases:
- A train is in tunnel A
- There is a train on track A coming up to use the tunnel that should be given priority (because signal 2 will be red and it appears as an exit to 3 even though that isn't possible with the track layout)
So when 3 is red, a train on B is only allowed to proceed on its own track.
In that way, trains on B use track A if there is spare capacity but any vehicles already on A get priority.


