-
 en
en
-
 pl
pl
This page documents the process artists must go through to create a set of ground sprites. The Page should link to a number of Automated files.
Contents |
Step One
Downloading and understanding the files you will need.
Download the required and Example files from this site http://ottd.mudpuddle.co.nz/terrain-256/ the files you will need are as follows. Ground*.blend.zip, Outlines.zip the other files are optional
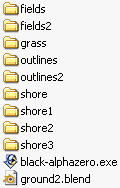
The important files and folders that must be kept are Outlines, Outlines2, *.Blend, and if on windows with photoshop Black-AlphaZero.exe
Outlines the folder contains overlays used by blender to cut the renders, thus making the testilate fully. Outlines would be used for flat standard ground tiles.
Outlines2 the folder contains overlays which just cut the bottom off, this lets things such a fields, shrubs, rocks etc... stick aobve the top of the sprite. for correct visual display both overlays may need to be used. (ask me "Alltaken" if that is the case)
Below are uneeded (example) folders
Fields one and Fields2 are optional folders (i created them as output folders for rendered ground sprites) these particular images used the outlines2 overlays to allow for the crops to go above the top of the sprite.
Grass is the name of the folder i created to store my rendered "standard" grass tiles. (i.e. not with shores, not with rocks on them.....) this could be named anything you like. i.e. you could name it desert, snow....
the Shore folders, are fairly important, these are also part of the "Grass set" but are Shore tiles for it. you could call the shore folders anything you like, but i adopted Shore-Shore3 refering to the water level and how far up the tile the water was ((for underwater sprites)
Black-Alphazero.exe is a droplet created for PS7 in windows, it functions as a method to remove the Black from rendered sprites and make it alpha (allowing testelation and correct overlaying) this needs to be done since blender outputs sprites with the Black overlays from outlines/outlines2.
Ground*.Blend (currently Ground2.blend version numbers will increase as the file is improved) this is the .Blend file that you will create your GFX in and render from, this handles most automation of things, and will make your job very quick if you use it correctly
Step Two
Editing the file to create new items
i am not designing this tutorial to teach people how to use blenders basic features, i will however show people the more advanced functions which are required to create ground sprites.
for basic tutorials on things like texturing and blender navigation visit this page and work throught their tutorials. http://blender3d.org/cms/Using_Blender.80.0.html
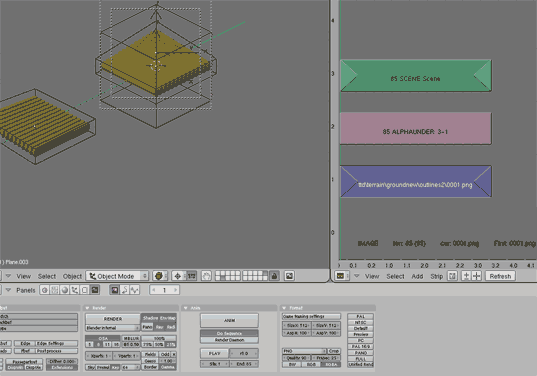
This is the Opening screen that most users should see when they open the ground*.blend file. The left pane is the 3d window and should be looking through the camera, the right view is the sequencer, and can be removed for most things you need to deal with, but may be required towards the end of your modeling/rendering process. the bottom pane is your Button panel with all the functions you need to edit textures and other settings. (as you should know from your tutorials)
Layers
First and foremost, the layers of the files should be interesting to you.
layer 1 is the standard ground sprites. these are used for rendering combinations 1-85 of the normal ground sprites, (i.e. no shores, no rocks, no added stuff)
Layer 2-5 are the various shore height layers, these contain a plane at the water level height which will cut the ground at water level and not render anything below that level (do not touch these large planes unless you know what you are doing)
Layer 10 contains all the lighting, this layer will need to be turned on when rendering to get any colour.
Layer 11-12 currently contains farmland sprites. this layer could be edited by users to contain rocks, shrubs, cows, holes, caves.... (whatever might be on a ground sprite)
All the rest' feel free to do as you wish with them
Objects
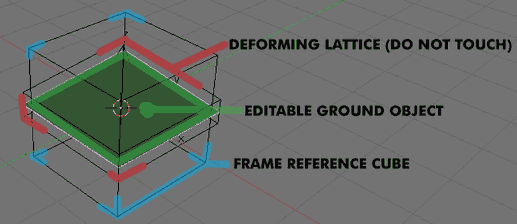
The objects that we are presented with on the front screen as as follows.
lattice the deforming lattice controls the deformation of the ground sprites which are children of it. this must NOT be edited (unless you know exactly what you are doing) as it provides the shape to the sprites when they are rendered, this is one of the most important elements of the automation process.
Ground object the Ground object can be edited and messed with freely, this is what we will be seeing when rendering, please don't delete this object, unless you know how to parent a new object to the lattice.
Frame reference cube This is a reference to show the user how large objects can be to still be rendered within the camera frame. you will notice that on layers 11, and 12, the rows of plants are within this bounding frame.
Editing linked objects
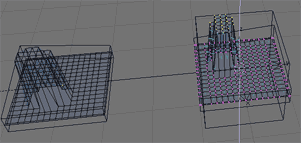
The file is Automated so that if you edit one Object, "All" (or most) objects within that layer will be equally edited. this means 85 sprites can be edited with a single operation, the limitations of this (with current blender releases 2.37a) is that you cannot use Sub Surf on your items.
if you are wishing to edit individual tiles, then you will need to create new objects, or split the mesh data (you will need to learn how to do that yourself)
Step Three
Rendering your images
Rendering you images is a fairly important part of the process but is "very easy" with the automated system i have set up.
choosing the correct overlay
you need to first decide if you should be using the images from "outlines/" or "outlines2/" (depending if you have objects that will stick above the back of the sprite), Outlines of course being the standard and Outlines2 being for items that stick up the back.
setting the overlay images
In this image the only important object in the Sequencer is the botton "Blue" bar. to set your overlay sprites (to make the tiles testelate in-game) you must follow these steps.
Right Click the Bottom Blue object to select it
Press the C key and select Change images, to select which overlays to use.
Navigate to the Overlay folder this will be different on each computer system. once in a folder named Outlines or Outlines2...
Press the A key untill all 85 images are selected, then...
Press Select images
you should now be ready to render
setting the overlay images
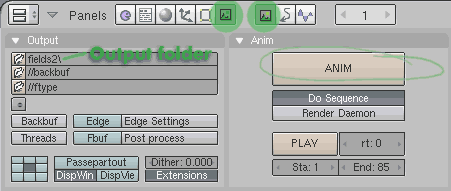
I have circled the buttons you should touch in these panels, (unless you know what you are doing of course)
The Circled buttons are how you get to the render options (assuming you don't know that about blender already)
Output Folder In here type the name of your output folder, in my earlier example i used names like Grass, Shore, Shore1, Shore5, Fields, Fields2. you can name it anything you like (follow it by a slash to show its a folder) it will create a folder in the same folder that the .blend file resides in (unless you choose to select another folder within your system) do not set this to outlines, or outlines2
RENDER (not shown on this screen) will render the current frame (left and right key, or up/down key changes the frame) you should use this to test your file/ textures before rendering out to file.
ANIM is the button you should press when you want to output ALL 85 sprites in the layer, this will automatically save your files out to the specified folder.
If in Windows and Using Photoshop, then once you have rendered your images, you can drag the entire rendered folder onto the Black-Alphazero.exe program, this is a batch convertor to remove the black from ALL 85 of the images. do it for each folder you render (BUT DO NOT do it on Outlines, or outlines2)
Step Four
Getting sprites ready for game use.
This section cannot be completed yet, as it is waiting for the format to be defined and finalised.
| ||||||||||||||||

