


Basic tutorial:
Advanced railway tutorial:
In game tutorial:
Railway construction:
- Building tracks
- Building stations
- Building depots
- Placing signals
- Buying & selling trains
- Converting railways
In this tutorial, you will learn how to build train (railway) stations, and how to connect railways to stations efficiently. Building stations efficiently is very important if you wish to establish a great train empire. There are hundreds of ways you can build stations. The examples below should put you on the right path.
Contents |
Building train stations
-
Open the Railway Construction toolbar by clicking the
 button.
 Railway Construction toolbar.
 -
Click on the Build railroad station button
 . The Rail Station Selection window appears. Remember, you can hover over any button or right click* for a description of what it does.
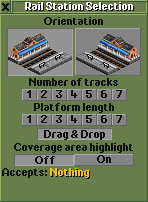 Rail station selection window.
 - Set the Number of Tracks and the Platform Length. Remember that each "unit" will take two carriages or engines, so choose the length of your station according to the length of the trains you want to load there. For example, a platform length of 3 can accept one engine and five carriages. Longer trains can stop there also, but loading/unloading will be slower.
- Select the orientation for your station to run the track in the right direction.
- Find a place for the new station on the map. Besides building on flat land you can also build on slopes. It is possible to build over existing straight tracks.
- Click to build the station.


* You can right click for information if the "hover over delay" is set to 0.
What kinds of stations should I build?
That is completely up to you, but here are some general guidelines:
- Trains should not cause traffic jams while entering and exiting the station.
- Stations should be long enough for trains to fit completely (otherwise loading times will be long).
Below are some examples of stations. Each example is presented in two different signal styles. One style uses path signals; this is the preferred method of signalling. The other style uses block signals and is mentioned here for legacy reasons. Read the article on Signals to learn more about the different signal types. How to build signals is covered in Building signals.
When using path signals, remember that your longest train needs to be able to wait at all signals without blocking junctions. For this reason, some of the path signal screenshots do not show the full station, but show the full signal path.
Single stations
- Single terminus stations can service 1 train at a time. These stations work well when there isn't much cargo to transport.

Single terminus loading station with path signals

Single terminus loading station with block signals

Single terminus unloading station with path signals

Single terminus unloading station with block signals
- Single "Ro-Ro" stations ("Roll-On Roll-Off", see Wikipedia) have the advantage that incoming trains don't have to wait for outgoing trains to leave. While this benefit is very small in the case of single stations, the Ro-Ro setup becomes far more effective with multi-platform stations (see below).
It is good practice to make the loading-exit and unloading-entrance lines to go straight into the station, while the loading-entrance and unloading-exit lines can loop around. Trains delivering cargo will deliver it faster and loaded trains can leave the station faster.
As you may have noticed, there are no path signals used in the example with path signals. This is because this station is essentially a single one-way track. As with any other one-way track, it is not necessary to use path signals. Using path signals here makes no difference to station performance.

Single Ro-Ro loading station with path signals

Single Ro-Ro loading station with block signals

Single Ro-Ro unloading station with path signals

Single Ro-Ro unloading station with block signals
Double stations
Double stations with two platforms are preferable for stations that need to handle more cargo. These may be the type of stations you build most often. Having two platforms means that once one train is done loading, the other can start loading immediately, without having to wait for the previous train to exit the station.
- The double terminus station has the advantage of an extra platform, but the disadvantage is that trains need to cross at the junction either when entering or leaving the station. However, it is cheaper and consumes less space than a double Ro-Ro station.

Double terminus loading station with path signals

Double terminus loading station with block signals

Double terminus unloading station with path signals

Double terminus unloading station with block signals
- You can also consider building a double Ro-Ro station to completely avoid any traffic jams and wait times. This station design will perform considerably better than the double terminus station in case you have more than three trains using the station.

Double Ro-Ro loading station with path signals

Double Ro-Ro loading station with block signals

Double Ro-Ro unloading station with path signals

Double Ro-Ro unloading station with block signals
Multi-track stations
Once the stations start servicing many trains, multi-track stations are preferable, to ensure there are no long wait times for trains. If more than one train is waiting to enter a station, it has too few platforms. Adding more platforms is an easy solution. A four-track terminus and Ro-Ro station are shown below. Bigger stations are just as easy: add more platforms, make sure trains can enter and exit each platform, and add the proper signaling.
- Below you can see a four track terminus station. Just keep in mind that trains might have to wait a little to let other trains pass. This is a good alternative to the Ro-Ro if you're tight on space.

Quad terminus station with path signals

Quad terminus station with block signals
- This is a four track Ro-Ro station. Incoming trains do not have to wait for trains to leave this station.

Quad Ro-Ro station with path signals

Quad Ro-Ro station with block signals
Through stations
A special type of station is the through station, which allows trains to enter and exit from both sides. This type of station is especially useful for those (mainly) passenger lines that connect one town with the next and the next and the next.
- The most simple layout is the double one-way through station. This station has one platform for trains in one direction and a second platform for trains in the other direction. You can view this station as just sitting on a double track railway, with no junctions and no special signals.

Double one-way through station with block signals
- The double two-way through station allows trains in both directions to use both platforms. This requires some junctions and signaling. If two trains arrive shortly after each other from the same direction, and no train is approaching from the opposite direction, the second train can use the other platform if the first one hasn't departed yet. This layout only works with path signals; there's no way to build something similar with block signals that will not break very quickly (try it yourself if you don't believe it!). This particular layout is also prone to deadlocks if you have multiple of these stations close to each other.

Double one-way through station with path signals
- A solution to the deadlock problem of the previous layout is the multi-track through station with dedicated platforms. For this type of station you need at least three platforms. The outer platforms on each side are one-way (one for each direction). The middle platform(s) are two-way, like in the previous example. This ensures that trains arriving from either direction always have at least one platform available and no deadlocks occur.

Double one-way through station with path signals
- A double through station with depots is useful if you need depots with your station. The example below uses the double two-way through station as a basis and adds a depot on both sides. The advantage of placing the depots like this rather than on the entry track is that trains inside the depot can leave in either direction. This layout is also much less prone to deadlocks than its depot-less counterpart, as trains can exit the station into the depot and free the platforms for other trains.

Double one-way through station with path signals