


It has been suggested that this page be split into multiple pages.
It's necessary to separate Manual/Tutorial
Basic tutorial:
Advanced railway tutorial:
In game tutorial:
Railway construction:
- Building tracks
- Building stations
- Building depots
- Placing signals
- Buying & selling trains
- Converting railways
- Setting vehicle orders
- Refitting vehicles
- Replacing vehicles
- Grouping vehicles
- This tutorial explains the orders for the version OpenTTD 0.7.0 and later. If you are using an older version of OpenTTD see the article: Orders (old)
Orders are fundamental to playing OpenTTD successfully. Conditional Orders are advanced orders that allow you extra control. If you do not issue any orders, your Vehicles will drive around aimlessly and you will be very lucky if they make you any money. In order to successfully pick up and deliver Cargo (which is after all the object of the game), you need to issue your vehicles orders. These are instructions such as "go here, pick up cargo, then take it here".
Contents |
Giving Orders
You are allowed to give orders to any vehicle you own. Your drivers will try to follow these orders (although they may get lost if your network is poorly designed, but that's a separate issue). To give orders:
-
Find and click on the vehicle you want to give the order to. The vehicle may be inside a depot if you have just bought it, or it may already be moving. For a train, clicking any carriage will have the same effect. This will display the vehicle window.
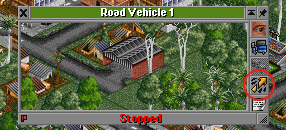 The vehicle window

-
Click the Orders button (circled in red in the screenshot). This will display the Orders window, which displays any orders the vehicle currently has (our example vehicle doesn't have any).
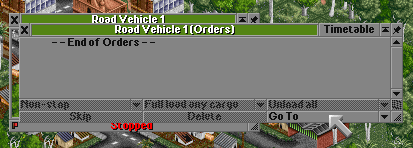 The orders window

- Click Go To and then click the target station on the map.
- Click the order you just created in the list to select it, and then tell the vehicle what it should do at that station. I.e., click Full Load to make the vehicle wait for a full load at that station.
Current Destination
You can always see the vehicle's destination in its Status bar and also in the Orders window. To the left of the individual orders, a black triangle points to an order. This is the current destination.
Order window
The following buttons appear:
- Go to
- Skip
- Delete
- and other buttons to Station instructions
Go To
This is the way to direct a vehicle to a particular location. It inserts a new order before the highlighted order, or if there is no order selected, adds it to the end of the list. Possible targets for go to are:
- Your own stations, but only stations where that particular vehicle is accepted. So you cannot give a bus an order to go to an airport if that airport doesn't have a bus station. You cannot send your vehicles to competitors' stations.
- Depots. This will change some of the other buttons - see Service and Refit below.
- Vehicles of the same type to copy orders or to create shared orders. See below for more information.
- Waypoints, you can send a train to a particular waypoint to influence its choice of track or if the stations are too far apart and the train gets lost easily. A bouy is a type of waypoint for ships traveling long distances.
The Go to button has the following options:
- Go to
- Go to nearest depot
- Conditional order jump. With this option it is possible to leave out stations if, for example, the train is fully loaded.

Go To options.
See Quick Goto for shortcuts to create orders.
Delete
This will delete the highlighted order from the vehicle's list, effectively canceling service to that station with that vehicle.
If the "-- End of Orders --" line was highlighted, then the entire list is deleted when the button is pressed. Note that the line reads "-- End of Shared Orders --" and behaves differently if the order is shared. See shared orders for details.
Skip
This causes the train to skip the order it's currently fulfilling and move onto the next one. Pressing Skip while the vehicle is on its last order will cause the vehicle to start again at the first one.
Station instructions
Besides the buttons skip, delete and go to, there are other buttons to specify exactly what a vehicle should do at a station, such as making it wait for a full load, or forcing it to unload its cargo. Road vehicles, boats and planes have Full Load, Unload, Transfer buttons; trains have an extra Non Stop button. To add instructions to an order, click on that order (which enables the other buttons), and then on the instruction (Full Load, Unload, etc).
When you select the order go to station, the following instructions are available:
- Change the stopping behaviour
- Change the loading behaviour
- Change the unloading behaviour
When you select an order go to depot, this changes the available buttons:
- Refit (instead of loading behavior)
- Service (instead of unloading behavior)
Loading options
Now it is possible to manage loading and unloading separately. You can:
- "Load if available" to everything you can get
- "Full load all cargo" to get a full load of everything
- "Full load any cargo" to full load of one load
- "No loading" to load nothing.

The load options.
Load if available
The vehicle will go through the station, load the cargo that will be available at that time and exit to the next destination. It is the initial default option. This is not recommended for use, because you will most likely want a vehicle to leave with a full load to cut down on travel time. (except for vehicles carrying passengers, mail)
Full load
This makes the vehicle wait until it is completely full of cargo before leaving the station. It has two options:
- "Full load all cargo", the vehicle will not leave until it is completely full of cargo. (Full load) is added to the order. Ctrl + click on a station will make the station order 'full load all' automatically.
- "Full load any cargo", the vehicle will leave if it is full of any of the various cargos it can bear. (Full load any cargo) is added to the order.
Note: In case of aircraft, "full load any cargo" means "wait for passengers". While this is inconsistent, it is usually the wanted behaviour (source).
No loading
The vehicle will pass through that point without loading anything. (No loading) is added to the order.
Unloading options
To unload you can:
- "Unload if accepted" to unload only accepted cargo.
- "Unload all" to unload everything.
- "Transfer" to transfer the load.
- "No unloading" to unload nothing.

The unload options.
Unload if accepted
The vehicle will go through the station, unload all cargo which is accepted at this station and exit to the next destination. It is the initial default option.
Unload all
This instructs the vehicle to leave any cargo it is carrying at a station. Any cargo accepted by that station will be handled as usual, i.e. you will be paid. Any cargo not accepted by the station will be unloaded anyway and left for another vehicle to pick up. The cargo will wait in the station showing "En route from (source)" in the Waiting screen. That vehicle will not receive a payment for any cargo that is not accepted.
This option does not prevent the vehicle from picking up any new cargo at that station without pressing loading behavior.
Transfer
This option will have the train unload its cargo to a station regardless of acceptance, just as Unload does. However in this case you will receive part payment for the distance it has traveled so far. This is useful to run a feeder service without your vehicles showing a negative profit if they are not running the final part of the journey.
This option does not prevent the vehicle from picking up any new cargo at that station without pressing loading behavior.
By default the vehicle will also collect any waiting cargo as usual (the order will show "Transfer and take cargo"). Confusingly this can include the cargo you just dropped off! If this is not what you want, you can select "No loading" from the loading options drop-down menu (so the order now reads "Transfer and Leave Empty").
No unloading
The vehicle will pass through that point without unloading anything. "(No unloading and...)" is added to order.
This option does not prevent the vehicle from picking up any new cargo at that station without pressing loading behavior.
Stopping options
You can:
- "Go to"
- "Go non-stop to"
- "Go via"
- "Go non-stop via"

The route options.
Non-Stop
It is possible to go directly to a station. Non-stop will prevent a vehicle stopping at any of the stations it passes through on the way to the highlighted destination.
Go via
It is possible to go via a station. (For every station it is possible to go non-stop). This is useful if you want to use a station as a waypoint.
Service
This option is available if you have a go to depot order selected. See Servicing and the description of the Allow goto depot orders option for details.

The options of the service button.
Refit
You can include an instruction to Refit a vehicle in the orders list. When you select this you will be prompted to choose the type of cargo to refit the vehicle to carry. This order is of limited use, as normally you only refit a vehicle for a cargo once.

When asked to reform mandates the type of load.
Timetable
Timetables let you specify how long vehicles should try to take to travel along each part of the route and how long to spend in each station, as well as specifying speed limits between orders. See the timetable article for details on how to use them.

The timetable interface.
Copy Orders
If you want to set up a service that is used by more Vehicles, it is repetitive to give each of these vehicles orders separately. Imagine a bus service where 5 buses go around to 5 Stations in a town for a frequent passenger service. It is boring to carry out the same steps 5 times over, so you can copy all orders from one vehicle to another.
Instructions
- Give out the orders as you would normally do for the first vehicle.
- Now click on the next vehicle, go to its order window and press Go To
- Instead of clicking a destination as before, click on the first vehicle which already has its orders set (either in its Depots or if it has been set loose; on the road/track/etc.)
- You will now see that the second vehicle has the same orders as the first one.
To prevent mistakes, you can only copy orders to a vehicle if it doesn't already have orders. This is because in a busy station you might accidentally click on a vehicle with existing orders and overwrite all your hard work.
Copying orders is still not the best solution because if you want to change orders later you must reassign them individually to each vehicle. See shared orders for an even better way to give out orders.
Shared orders allow you to share one set of orders between multiple vehicles so that when one vehicle's orders are updated, the other vehicles sharing the same orders are also updated. It doesn't matter which vehicle you update - all vehicles sharing those orders are changed.
Instructions
- Open the orders list for the vehicle you want to share another vehicle's orders, and click on Go To.
- Hold down Ctrl and click on another vehicle that has the orders you want to share.
- Now the two vehicles share the same schedule; they are linked together. You will see that the orders from the other vehicle are displayed and the last line now reads --End of Shared Orders--.

The schedules for the 2 buses have been shared
You can link together as many vehicles as you want, there is no limit, but of course you can only link the same type of vehicle together because they will be using the same stations.
At some point you may decide you don't want a vehicle to share orders any more. Of course you can't simply delete them because this will delete them on all vehicles linked to that share. Instead:
- Open the orders list of the vehicle you want to remove from the share.
- Select the last line: --End of Shared Orders--
- Click Stop sharing.
You will see that the last line says --End of Orders-- again. All other vehicles sharing those orders are unaffected by this change. You can now control the unshared vehicle's schedule independently from other vehicles as normal.
The  icon to the right of the Orders window (or Timetable window) is the Shared Orders button. It shows a list of all the vehicles that have the same shared orders as the current vehicle. The icon will only be enabled if the vehicle is sharing orders.

List of vehicles with shared orders
Notes
- Unlike copied orders, sharing orders is possible for vehicles that already have an existing schedule. This is because to share orders you must hold down the Ctrl key, making it unlikely that you could accidentally lose the vehicle's schedule. When doing this the vehicle will lose all of its existing orders, and only have the shared ones.
- You can use the clone vehicle button (of depot window) or buy a copy button (of vehicle window) to create an identical copy of a vehicle but by default orders are copied. If you want to share orders with cloned vehicles, hold Ctrl as you click on the vehicle to clone.

Clone vehicle button.

Buy a copy button.Only available if the vehicle is in the depot.
- With shared orders, there is no "master" set of orders (e.g. one vehicle that stores the main orders list that the others link to) that you can inadvertently delete. As long as at least one vehicle with the orders you want exists, the orders list is preserved.
Orders checking
When you are running a large company with many different vehicles and a vast network, it is inevitable that mistakes will be introduced into some orders lists. For example, this can occur when a station is deleted or if you accidentally click on a hangar instead of an airport when giving orders to an aircraft.
The order review system automatically runs in the background and checks for four typical problems that can occur in an order list. In the event it detects one, it will trigger a news message that informs you about the anomaly so that you can take action.
Too few orders
In order for a vehicle to make profit, it needs at least two stations in its schedule. Depots or waypoints do not count as they do not allow picking up or dropping off of cargo.

"<Vehicle> has too few orders in the schedule".
Duplicated order
Sometimes a station is accidentally selected twice consecutively. For most vehicles, this causes quite a mess in the pathfinder; for example an aircraft that takes off and lands again at the same airport.

"<Vehicle> has duplicate orders".
Invalid orders
If you delete a station a vehicle is due to stop at, the ghost of the station will be visible for a while (in the form of a gray station name label). This allows you to construct a new station in the same location as the old one which will assume the old station's name. Vehicles will start arriving at that station (if it's still of the correct type) without any need to change their orders.

"Invalid order"
However, if you leave it too long or deliberately don't build a new station to replace an old one, the ghost station will eventually disappear. Any orders that vehicles had that referred to it will be replaced with Invalid Order and will be skipped.
When you remove a depot, any orders that vehicles have that refer to it will be immediately replaced with Invalid Order as no trace or ghost marker is left behind when you remove a depot.
Invalid station
If you delete a part of a station (for example the bus stop that is attached to a train station) the order will not become void as the station does still exist. However, the vehicle has no way to get to the station as the correct facility is missing. This can happen when the station does not serve the correct vehicle type (such as a bus going to a train-only station), an articulated vehicle attempts to stop at a station without drive-through stops, or a train attempts to stop at a station with incompatible railway types (such as railway on maglev). This leads to the vehicle searching for the station forever.

"<Vehicle> has an invalid station in its orders".