


Basic tutorial:
Advanced railway tutorial:
In game tutorial:
Railway construction: Road construction: Waterways construction: Airport construction: General construction: Working with vehicles:
Signals are used to direct your trains and prevent crashes.
This tutorial provides a basic introduction to signalling. For in depth information on the different signal types and how to use them, see Signals.
Contents |
Limitations
- You cannot place signals in squares containing junctions or a level crossing over a road.
- You cannot place signals on Bridges or inside Tunnels. However, a patch by HackaLittleBit can simulate signals being placed automatically.
Constructing a signal
-
Click the Build railway track
 button on the menu bar to display the Railway Construction toolbar:
 The Railway Construction toolbar
 -
Click the Build railway signals
 button from the Railway Construction toolbar to display the Signal Selection toolbar:


-
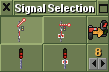 The default Signal Selection toolbar. Only has path signals.
 -
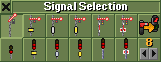 The advanced Signal Selection toolbar


Explanation (you can ignore everything except path signals, they're all you need - see also Which signal type to use):
| Signal types | |
 and and 
|
Block signal |
 and and 
|
Entry pre-signal |
 and and 
|
Exit-signal |
 and and 
|
Combo-signal |
 and and 
|
Standard path signal (can be passed in the reverse direction, and is ignored in that case) |
 and and 
|
One-way path signal (cannot be passed in the reverse direction) |
| Other icons | |

|
Signal conversion tool - converts the signal type on the track to the one selected in the toolbar. See Building signals |

|
Signal density tool - sets how closely the signals are placed when auto build of signals are used. See Building signals |
There is no functional difference between the signal styles - it's only a question of aesthetics which one you use. In general, semaphores (older electro-mechanical signals) are appropriate until the 1970s, and modern electric light signals afterwards.
Furthermore, semaphores will be placed by default instead of light signals before the year configured via the "Automatically build semaphores before" setting (1950 by default). This setting is found in the "Advanced settings" under "Construction" and then "Signals".
-
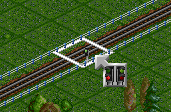
Once you have selected a signal type, position your cursor over the railway track where you want to build the signal.
-
Click once to construct a signal on the track. Unless you chose a path signal, you will build a two-way signal. Path signals always face one direction only.

-
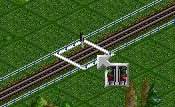
Click again to convert your signal to a one-way signal. Unless you have built a standard path signal, only trains approaching from the direction the signal faces will be able to pass it.

-
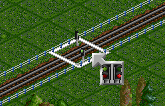
Click again to convert the signal to face the opposite direction.
-
Click again to convert your signal back to a two-way signal again.


Constructing a line of signals
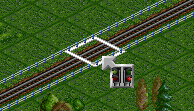
You can build several signals of the same type at once by clicking and dragging along the section of track you want signals built on. You may find it useful to click and drag from an existing signal, as doing so will construct a line of signals facing the same direction:
-
While the Build railway signals tool is selected, position your cursor over an existing signal.
-
Click and drag the mouse along the railway track.
Note: If you hold Ctrl and drag one or more squares, signals will be automatically built in the direction you dragged until either a station, another signal or a fork in the track is found.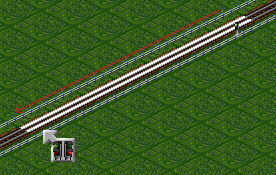
-
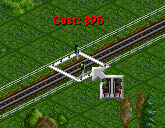
Release the mouse to place the signals.
The spacing between signals depends on the setting in the Dragging signal density button on the Signal Selection toolbar. Signals are placed every N game tiles (default: 4) when constructing a line of signals this way.
Click on the left/right arrows to change the spacing. If you click and drag from entry, exit or combo signals, this method will construct block signals facing the same direction.


Removing signals
Click on the Bulldozer  button on the Railway Construction toolbar to remove existing signals.
The white square will change to a red square. Click on individual signals to remove them, or click and drag along a section of track to remove a line of signals. Click the Bulldozer button again to deselect it. You can also use the R key shortcut.
This tool also uses the value displayed on the Dragging signal density button in the Signal Selection toolbar.
Converting signals to different types
To convert an existing signal to a different signal type, click the Signal Convert button in the Signal Selection toolbar. Click on an existing signal to convert it to the signal type selected in the Signal Selection toolbar.
To turn signal conversion off (to return to constructing signals), click the Signal Convert button again.
Holding the CTRL key while clicking on a signal (with signal conversion off) toggles the signal through the available signal types.
Holding the CTRL key while clicking on a signal (with signal conversion on) changes the style of a signal (semaphores/ modern signals) to the signal style selected in the Signal Selection toolbar. This will however cost money.
Which signal type to use
Unless you are building some really crazy setups, you'll only ever need standard path signals.
Assuming all of your tracks are only used in one direction, simply place a one-way path signal anywhere it would be OK for a train to stop, facing in the direction the train would be coming from. Factor in the length of you longest train when placing signals. Try to avoid placing signals so that long trains can block junctions.
Block signals can be used for some more advanced constructions. For more details on all types of signals, including examples, see Signals.
Next: Buying trains »