Basic tutorial:
Advanced railway tutorial:
In game tutorial:
Railway construction:
- Building tracks
- Building stations
- Building depots
- Placing signals
- Buying & selling trains
- Converting railways
- Setting vehicle orders
- Refitting vehicles
- Replacing vehicles
- Grouping vehicles
Contents |
Manual replace
You can replace a single vehicle without losing its order list following these steps:
- send the intended vehicle to a depot
-
delete (sell) the vehicle (or the engine only if it's a train)
- now, the first new engine/vehicle built will have the same order list of the just deleted engine
- build the vehicle/engine of the desired type (it will have the same order list of just deleted one)
Autoreplace
Autoreplace is a helpful feature which allows you to upgrade your entire fleet of a certain kind of vehicle to a different type without having to sell and replace them individually. Imagine you've just finished building up a network of 40 buses and then a new bus type arrives - it would take a significant amount of time and effort to send all those to depots, sell them, and then buy the new bus - this is the kind of situation where you need autoreplace. You can replace train models to another train model, and wagons can also be changed. This is most helpful in NewGRF sets which introduce new, faster wagon types as the game progresses. (If you want to replace old vehicles with the same model, use Vehicles instead.)
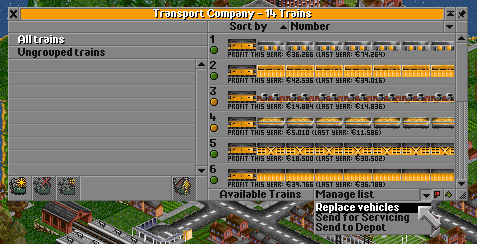
To get to the replace vehicles screen, first open the vehicle listing of the type of vehicle you want to replace (trains are shown in the screenshot below). Then from the Manage list menu, click Replace vehicles.
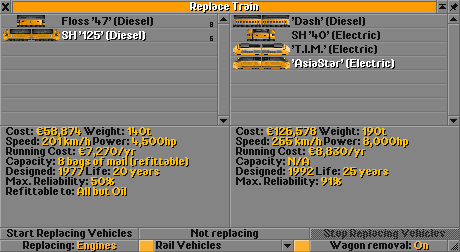
The replace (vehicle type) window appears, which looks like the one for trains below.
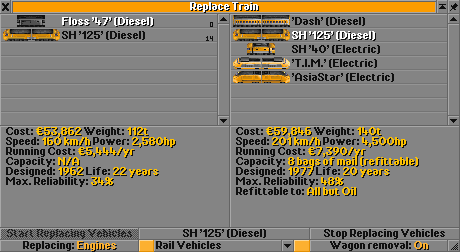
The left hand pane shows the vehicles you are currently using. The right pane shows new vehicles available for you to upgrade to. You click on the old and new types to select them define the replacement.
If you are upgrading trains, there are several types available, and you can choose the type by adjusting the menu at the bottom in the middle of the window (displaying Electrified Rail Vehicles above). For trains you may also toggle between replacing engines and wagons by clicking the Replacing: Engines button shown.
Naturally it is not possible to upgrade between different types of train because the train would need to be able to enter a depot and leave as a new type. The exception to this rule is upgrading from normal to electric trains (if you have electrified rails in place) since both will run on electrified rails and can be built from electrified depots.
To begin replacing vehicles once you have made a selection, you click Start Replacing Vehicles.
Once all vehicles of a type have been replaced, the old vehicle type will turn grey in the replace vehicles window (as the Floss 47 is showing then). Click on it and click Stop Replacing Vehicles to complete the procedure and it will then disappear from the list.
Wagon removal
In the bottom-right corner of the replace vehicles window is a button labelled Wagon removal on/off. If this option is set to on, then when a 1-unit engine (for example, the Gresley A4) is replaced with a 2-unit engine (the IC125 for example), the first carriage in the train will be sold to maintain the original length of the train.
Note that this only works one way; if you were to replace a train with two engines (e.g. IC125 or some DMUs) with a single engined train, you would shorten the overall length. It is not padded back up to the original length because you cannot specify which carriage would be used to do that.
Servicing
Once you select "start Replacing" the game will replace the vehicle on it's next arrival at a depot for maintenance; however this does not automatically give vehicles an order to report to a depot for maintenance.
If you would like to upgrade all of the vehicles immediately instead, you can issue an order to the vehicles in question to report for maintenance by using the "Send [Vehicles] for Maintenance" option on the Vehicle manager window for the group of vehicles you selected to upgrade, or for a sub-group of those vehicles if you create one yourself. In addition you can also manually schedule individual vehicles this way by clicking each vehicle's "Send to Depot" button.
The above method is especially useful when you play with the Disable servicing when breakdowns set to none option enabled and Vehicle breakdowns are set to None, as the trains will not be serviced automatically.
Autoreplace's list of vehicles to replace the one selected will filter itself so only vehicles matching these requirements are shown:
-
- They may be refitted to the proper cargo. (Generally only applies to ships/road/air)
- They travel on the same type of infrastructure. (e.g. Ships on water, mag-levs on mag-lev track, vehicles on roads, Helicopter on Helipad, etc.)
In Open TTD 1.0 and higher Auto Replace will use different rules to replace vehicles depending on your funds:
-
The company needs to have more money than (autoreplace money limit) + 2 * (price for new vehicles).
- Auto Replace does not consider the sell price of old vehicles.
- The auto replace money limit is the same limit as the Autorenew minimum needed money configured in Advanced Settings.


