It has been suggested that this page be split into multiple pages.
本記事には輸送網の容量と輸送網の最適化の2つのトピックがある。別の記事に分割することが推奨される。(訳者注:原文での分割提案)
Contents |
輸送網の容量
このページでは輸送容量の理論的な扱いについて記載している。分岐と輸送網は非常に重要である。輸送容量に影響する様々な要因について考えてみよう。
信号間距離(SD: Signal Distance)
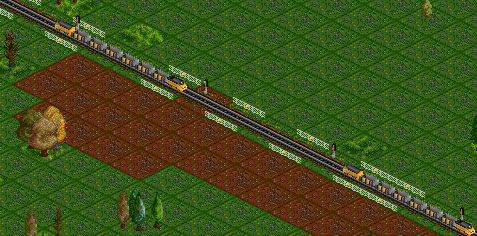
この件については明確である。広く間隔をあけた信号は輸送容量を低下させる。1つの信号をNタイルごとに設置した場合の信号間距離を考えたとき、最高速度で走行する2編成の列車間の距離はN+1以下には決してならない(図1)。対角線状の線路では、2Nの"半分のタイル"ごとに信号を、またはNの"1タイル"ごとに信号を設置することで、列車間の最小距離は"半分のタイル"に対しては2N+1、"1タイル"にたいしてはN+1/2以下にはならない。列車がこのような距離で走行しているとき、理論的には最大の列車密度で運行していることになる。残念ながら、実際にはこのような密度で運行することは不可能である。
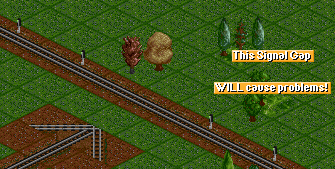
一貫性に配慮することは重要である。線路の容量は、最も間隔が広い信号間距離によって決まる。したがって、2タイルごとに信号を設置している線路に、たまたま3タイルまたは4タイル間隔の信号を間違って設置してしまった場合、容量は大きく減少し、渋滞の原因となる可能性が高い(図2)。このルールはカーブや分離、合流でも同様である。
対角線状の線路
OpenTTDの世界では、斜めの線路では減速する。よって、ボトルネックを軽減するためにそのような線路上では信号密度を増やす必要がある。直線の線路と対角線状の線路で、(SDではなく)列車間距離をできるだけ近づけるのは重要なことである。そうでなければ、直線から対角線状の線路へ入るとき、またはその逆の場合に列車は渋滞してしまうだろう。
簡単な実験により、対角線状の線路を走行する列車は25%速度を落とすことが分かる。よって、オートシグナル機能を利用している場合、斜めの線路の信号は手作業で修正する必要がある。
以下の例は対角線状の線路では列車の長さも同様に変化するという仮定の下作られたものである。この過程は一部のNewGRFの場合のみ正しい(この件はJapanSetについて有効であり、デフォルトの列車では無関係である)。
- オートシグナルの設定が3の場合、列車間の最低距離は4である。この変換は対角線状の線路では列車間は6の"半分のタイル"となり、信号間距離は5の"半分のタイル"となる(またはオートシグナルの設定を5にして設置しなおす)。
- オートシグナルの設定が2の場合、列車間の最低距離は3である。この変換は対角線状の線路では列車間は4.5の"半分のタイル"となる。対角線状の線路での列車間距離を5の"半分のタイル"とするには、信号間距離を4の"半分のタイル"にするか、オートシグナルの設定をおよそ2にすればよい。対角線状の線路での列車間距離を4の"半分のタイル"にするには、信号間距離を3の"半分のタイル"にする(またはオートシグナルの設定を3にして設置しなおす)。この信号間距離は直線と対角線部の比率が1/3タイルのために正確ではないが、直線と対角線部で同じオートシグナルの設定が利用できる。
- オートシグナルの設定が1の場合、列車間の最低距離は2である。この変換は対角線状の線路では列車間は3の"半分のタイル"となり、信号間距離を2の"半分のタイル"として設置するか、オートシグナルの設定を1にすればよい。ここでも直線部と対角線部で同じオートシグナルの設定が利用可能である。
信号間距離はどうすればよいのか
-
2タイル
信号間距離2は最低列車間距離が3となり、実際の線路で最適化された解である。
-
1タイル
信号間距離1には多くの問題がある。線路の分離は信号間の距離で起こる。斜めの線路に信号間距離1で合流することは可能だろうが、線路を構築する複雑性は非常に上がることになる。
-
1/2タイル
斜めの線路は2倍の密度の信号を設置できる。これは理論的には何となく興味深く、数ミリの誤差でニアミスする状況を作り出せそうだ。1/2タイルの信号間距離の最大の欠陥は、すべての直線の線路の信号間距離がそれよりも大きくなってしまうことだ。
いずれの信号間距離を選択するにせよ、一貫性を持たせることを忘れてはならない。信号間距離が2の鉄道網と3の鉄道網の混在は渋滞を引き起こす。これは信号間距離が全て3の鉄道網より容量が低下することになる。
列車の長さ(TL : Train Length)
これは両刃の剣である。より長い列車は現実的な加速度のペナルティを繰り返し受け、線路をより複雑に広くしてしまう。しかしより長い列車の長さは鉄道網の貨物容量を増大させてくれる。2両編成で前後に設置される機関車を利用する場合は追加の1/2タイル分の機関車により貨物を1両分短くしてしまうことに注意すること。
高速な鉄道網では3から5タイルの列車の長さが標準的である。信号間距離が2の鉄道網では列車の長さ4で列をなすのが最も好ましい。これにより、停止状態からの加速による反応速度が、均一な長さでない列車が混在する場合より早くなる・
輸送容量の定量化
列車密度(TD:Train Density)
Your network will carry a certain number of trains, and assuming you have a standardised train length, we can define some metrics. The Train Density (TD) for a track is given in units of trains per thousand tiles, and can be calculated by counting the number of trains on that track and dividing by the length of the track.
Typical measured values for an unoptimized network of 4-tile trains are a TD of 25 (trains per 1000 tiles).
The maximum TD before traffic jams become self-propagating can be measured by permitting a queue of trains to accelerate from a halt and then measuring the train-train distance when all trains have reached full speed, and using the formula
1000 / (TL + train gap)
This critical TD depends on the power and number of the engines, the weight of the train, the top speed, the SD and the length of the train. Because this critical density incorporates information about acceleration and time to reach top speed, it can also tell you about the practical maximum capacity of your network. For example, using trains with a lower top speed actually makes it easier to have a dense network. The average train-train gap is much smaller for rail than for monorail or maglev. Slow doesn't mean better, however, as the reduced line density will be more than compensated for by quick turnaround times.
For example, a fully-laden 4-tile Chimaera (top-end MagLev (en)) was found to have a train-train distance of 12, giving critical density of 1000/16 or 62.5. Repeating the previous example but using the electric rail T.I.M. (en) gives a train-train distance of only 6, and a critical density of 100.
It is possible to run a network at higher than the critical density, but it is ill-advised.
理論的に最大の列車密度
Simply put, this is the train density if your network is entirely filled with trains at the minimum distance between each other. You will never reach this.
This is given by 1000 / (TL + SD + 1)
For example, 4-tile trains and a signal distance of 2 will give a theoretical maximum train density of 140.
輸送容量(CC:Carrying Capacity)
Since TL alters the carrying capacity of a line, comparing TD across different TL is meaningless. In order to compare efficiency figures between different personal preferences, we need a new metric. This new metric will simply be a measure of how many units of cargo your network is transporting per year, per track. It will be directly proportional to the average quantity of cargo per track tile, and also to how fast this cargo is moving.
CC_day = TC / ( TL + TD ) * v_travel
CC_day = TC / ( TL + TD ) * v_kmh * 74*2/16/256*1.00584
CC_day = TC / ( TL + TD ) * v_mph * 74*2/16/256/1.6
CC_day = carrying capacity [in cargo units per day] is how much cargo can cross each tile in one day. This amount of cargo can be fed to the start of the line and delivered at the end of the line.
TC = train capacity [in cargo units], how much cargo one train can carry.
v_travel = speed [in tiles/day], v_kmh = speed [in km/h] and v_mph = speed [in mph] is the speed of the train.
TG = train gap [in tiles]. For track layouts which don't inject trains to form a high-density-stream this is the critical train gap.
TL = trainlength [in tiles].
The Chimaera from the above example has a carrying capacity of
CC_day=47*6*402/16*0,0056=40 Passengers/day
or
CC_day=27*6*402/16*0,0056=23 Bags of Valuables/day
The T.I.M. (en) from the above example has a carrying capacity of
CC_day=40*6*150/10*0,0056=20 Passengers/day
or
CC_day=20*6*150/10*0,0056=10 Bags of Valuables/day
Work on this unit is pending.
鉄道網をより効率的にするには
Ok, so now that we've defined the parameters that we had already intuitively understood, how can we use them to improve our networks? The golden rule number 1 of network optimisation is that trains on the network never slow down. There are two possible parts of a network where this could happen, splits and merges.
分離
For a track split, one must ensure that there is not a longer-than-normal signalling gap at the split point. This can be taken care of by careful or over-abundant signalling.
合流
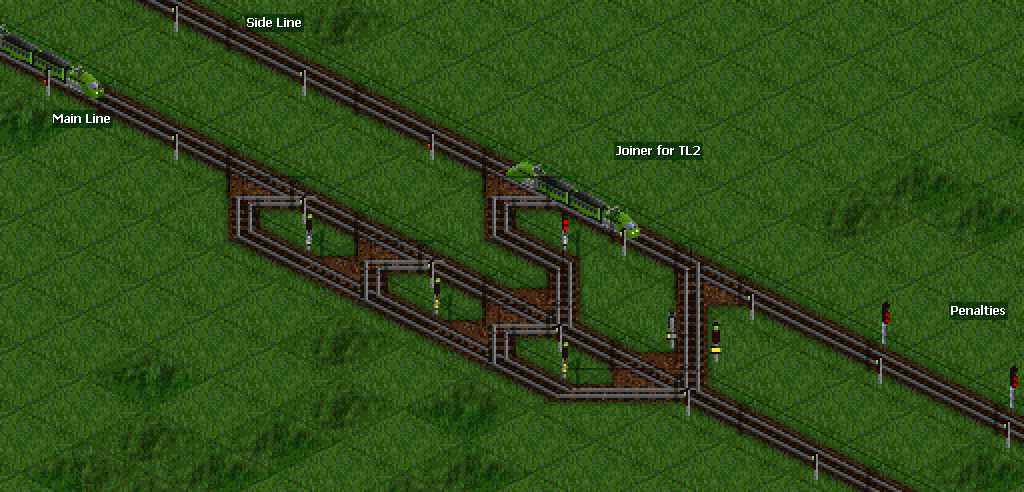
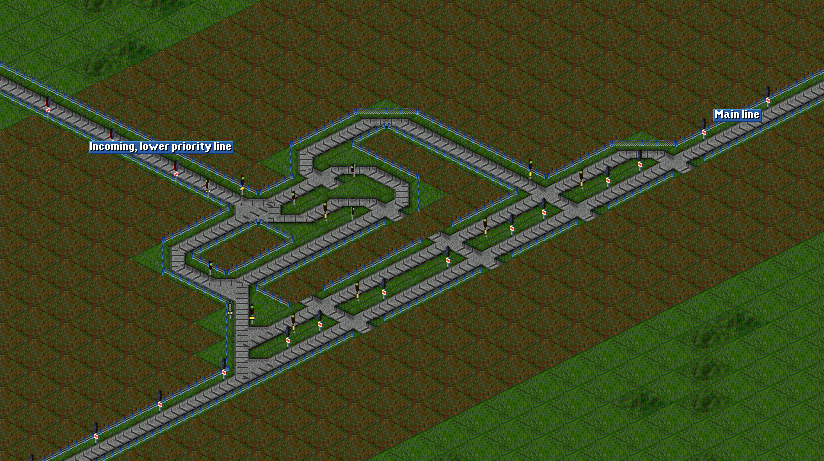
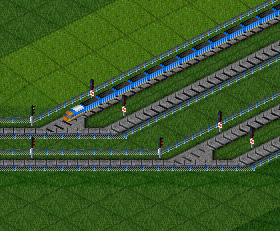
Merges present us with a unique problem. For a trivial merge, trains on the mainline could potentially be stopped by a sideline train. The solution is to give trains on the main track priority over the joining trains with a Priority Merge (en).
Consider a typical non-junction merge, at the exit of a pickup station. A tightly-packed optimised stream of trains enters the station, but because of differences in loading times, this order is disrupted on the station exit, and you end up with two tracks of loosely-packed trains. One of these lines, designated the main line, will have, on average, train-train gaps large enough to fit a third train into. Simply connecting the two lines together will not work, and a priority merge is required.
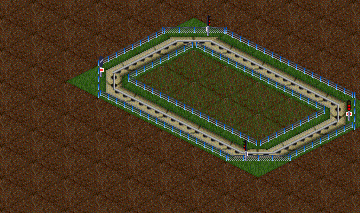
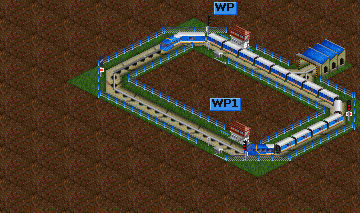
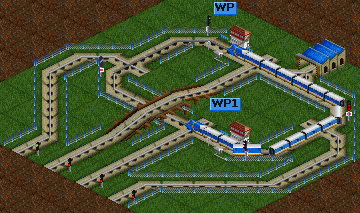
Note that, because trains that drop off cargo always spend the same length of time at a platform, it is possible to dematerialise and reassemble a tightly packed stream of trains, even one above the critical density! (Figure 3)
A first-pass merge using a priority block will reduce the traffic ratio from 1:1 to about 3:1 in favour of the main track (Figure 4). Adding a second priority merge straight after the first one would be a futile gesture, since trains on both lines would continue at the same speed and the mainline train would simply claim priority again. Introducing a delay by a loop of track, followed by a second priority merge, will reduce the sideline to a mere trickle of trains and will have filled in most of the available slots on the mainline. Existing solutions would involve a pre-acceleration track, however a cyclotron eliminates the need to lose momentum.
サイクロトロン
See main article [[en/Community/Junctionary/Cyclotron]]
A cyclotron is a priority merge with a loop, so that a train can wait for a slot on the mainline at full speed.
Trigger
A trigger allows to control when a train may leave the station. This increases the capacity of the track significantly. You can use the trigger to have several trains leave the station at a defined time gap. After they have accelerated, you can merge them to a single track. As the gap between them is always equal, the merge will always succeed.
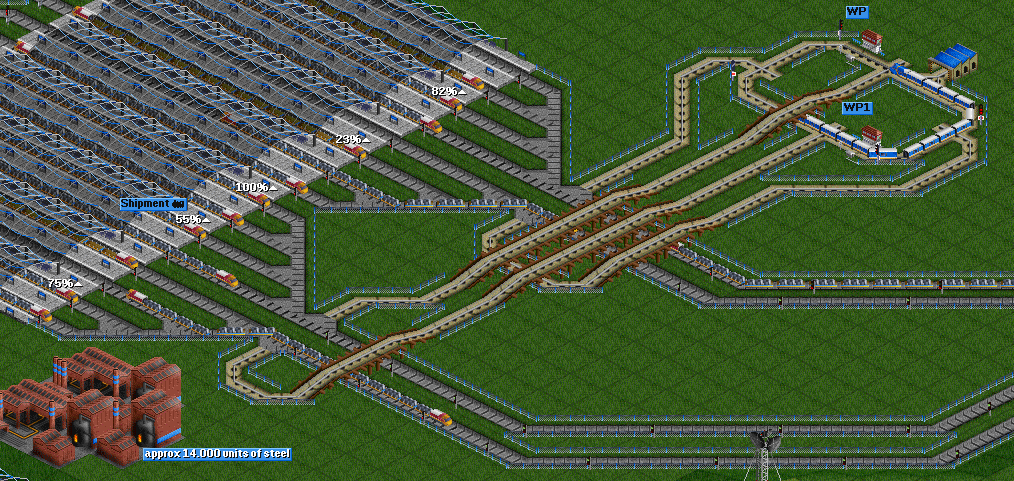
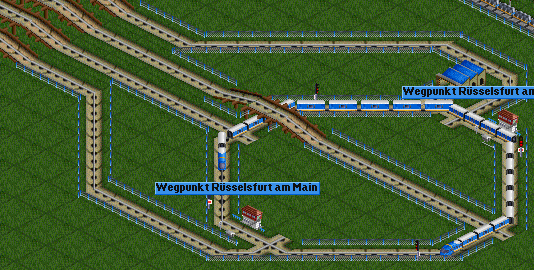
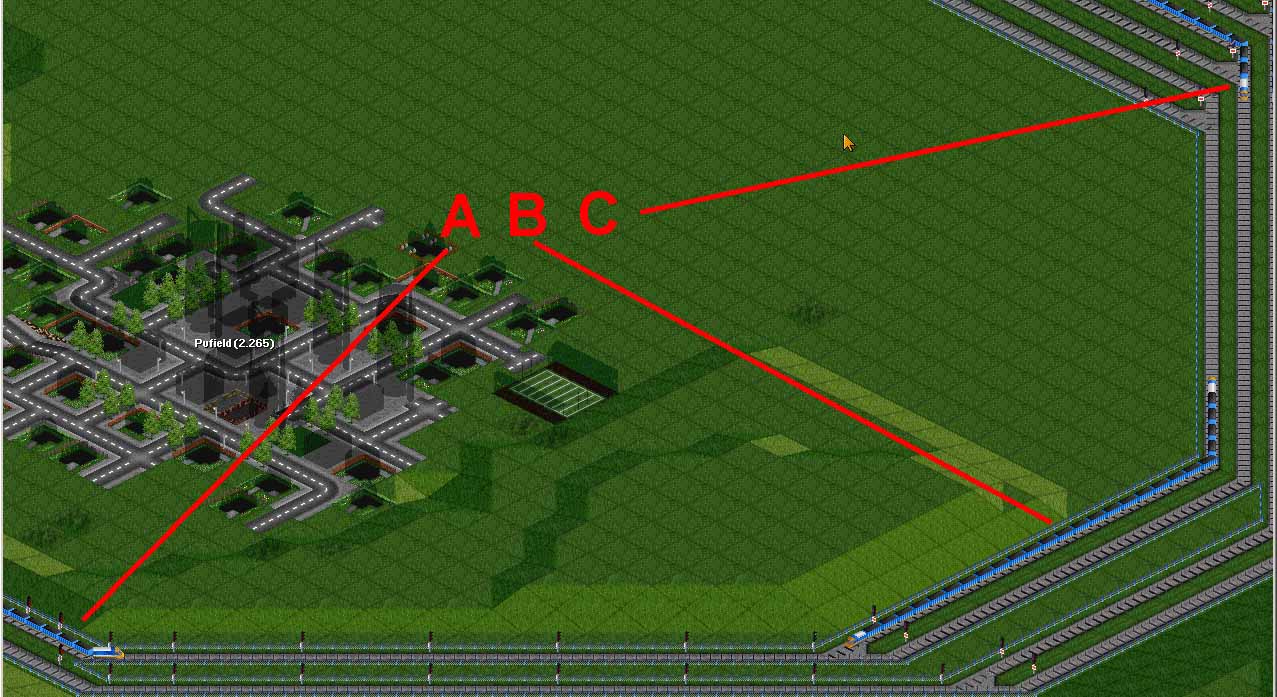
This set of screenshots shows the trigger itself. The main component is a circle track (A). It is divided into four segments using path based signals. A train travels the circle (B). Two waypoints are used to keep it moving. The length of the train is such that it almost covers three segments of the circle. Finally, each segment has an exit (C). To show the concept, a traffic light has been added to each track. When the train moves, each of the lights will shortly jump to green.
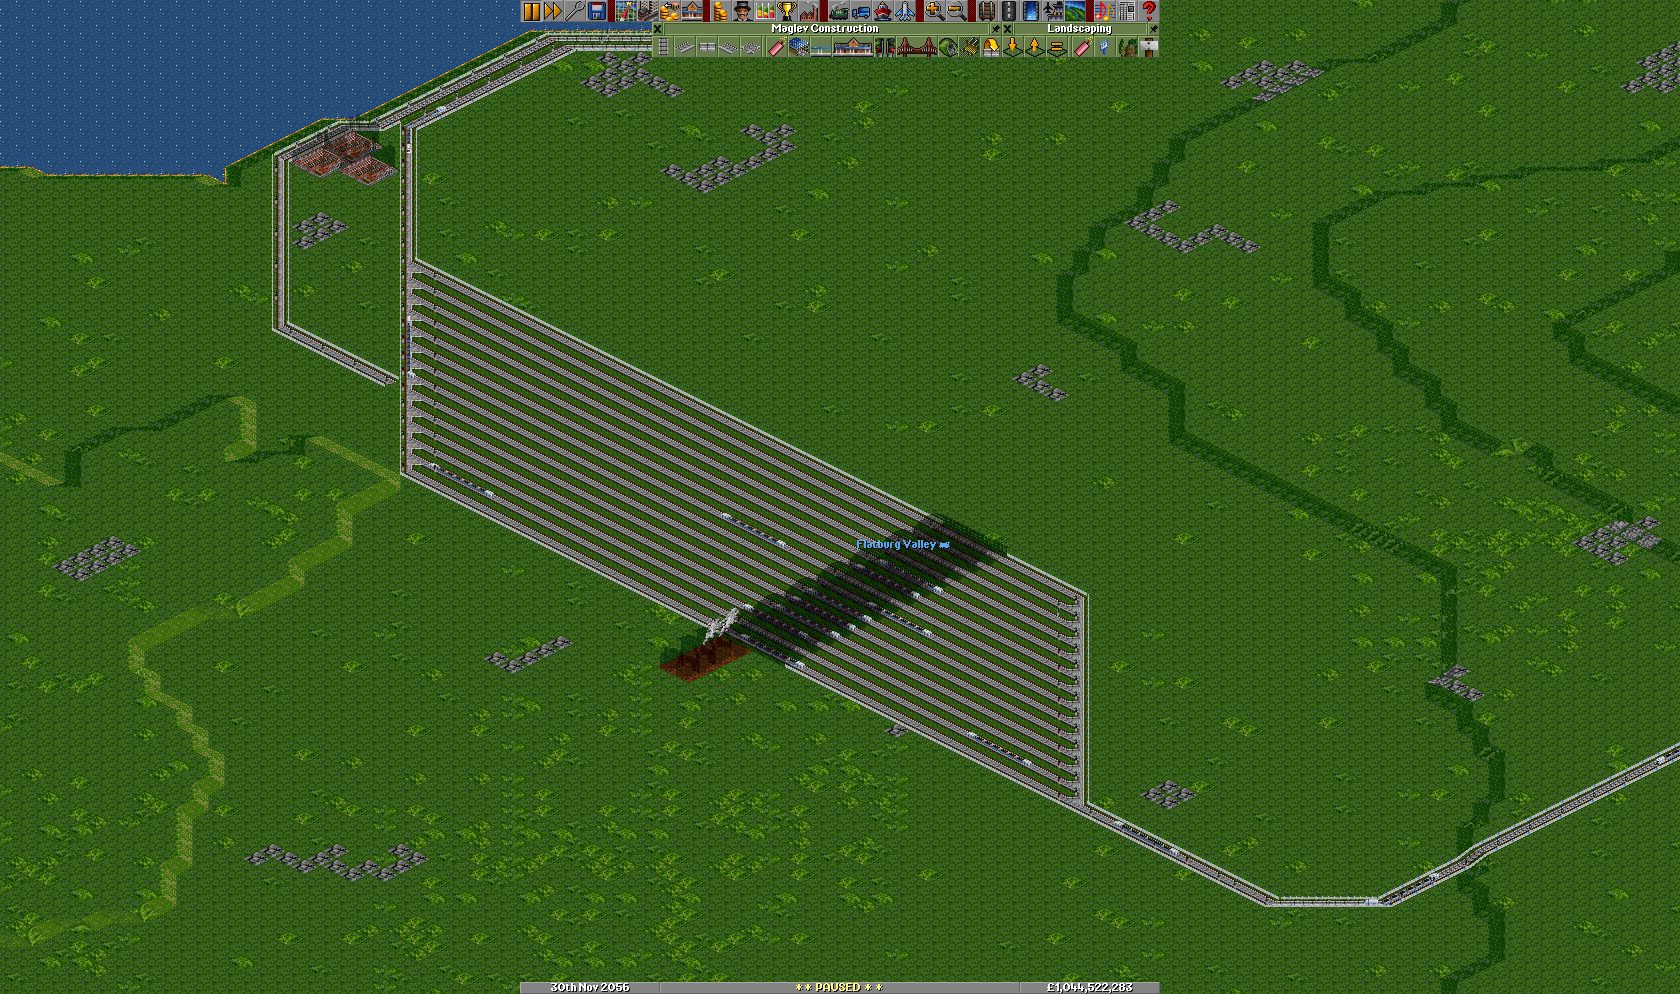
Now the trigger is connected to a high yield station. The station has 16 platform each 9 tiles in length. Four tracks leave the station. Later they are merged to two track:
Notice how the monorail an the magnetic tracks are connected. Each track leaving the station is connected with one segment of the trigger. Right after this connection a normal signal is placed. This way the trigger is able to stop trains from exiting the station.
Timing in this setup is crucial! Depending on the type and size of trains the exact size of the trigger must be changed. Steel trains are heavy. Hence the trigger must be slow. This is achieved by having very sharp turns in the trigger's circle tracks. As a result, the train travels at 131 km/h.
At a similar station, there are also 16 platforms each with 9 tiles. But the trains transport goods which are much lighter than steel. Hence the trigger's time gaps can be shorter. This is achieved by having a circle track with less sharp turn. As a result, the train travels at 226 km/h.
Step-by-Step-Merge
A Step-by-Step-Merge is an easy way to merge several tracks, usually from a station, one by one into each other, until only the main line is left.
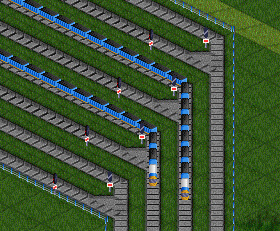
The first task is to get trains out of the station as quickly as possible. Platform room is precious, and a train needs to clear the station completely, before the next one can enter. We do this by providing one exit lane for every platform, and it should be about 150% of the length of the longest train. Add a path signal on the first track behind the station in order to clear the platform for the next train. Common errors here might be to miss one of the path signs, or designing the exit lanes too long or too short.
Next we start with a merge. You can merge on a straight track, but it's easiest and usually most efficient to merge in a turn. Make sure to place a path signal on every exit lane, as close to the merge as possible - but do not place a signal after the merge. Make sure that there is again plenty of room for trains to accelerate after every merge, about 150% of the longest train. Do not place any additional signals here, not even pathing signals. All following merges are designed the same way.
The nicest aspect about this merge layout is, that it actually works best under high traffic or even jam conditions: Once one train [A] clears the merge, the other tracks train [B] is allowed to accelerate. But the first train also cleared it's own segment, which permits one of the trains [C] from the merge behind to accelerate. Thus, you have two trains accelerating at the same time. This way, trains synchronize up to the station.
The example shown here handles traffic generated by 80 trains and 25000 crates of goods.


